There are many different lighting techniques for portrait photography. Anything from simple one-light setup to more complex settings that require multiple light sources, modifiers, and other gear.
One of my frequently used lighting setups for creative men and women portraits is the split light. This lighting setup produces more dramatic shadows in portraits.
To set up a split lighting pattern, you don’t need a ton of equipment – it’s possible even with natural sunlight. In this article, we will discuss what split lighting setup is, and how photographers can use it for creating artistic and dramatic portraits.
This post may include affiliate links. Please read our disclosure policy. [026]
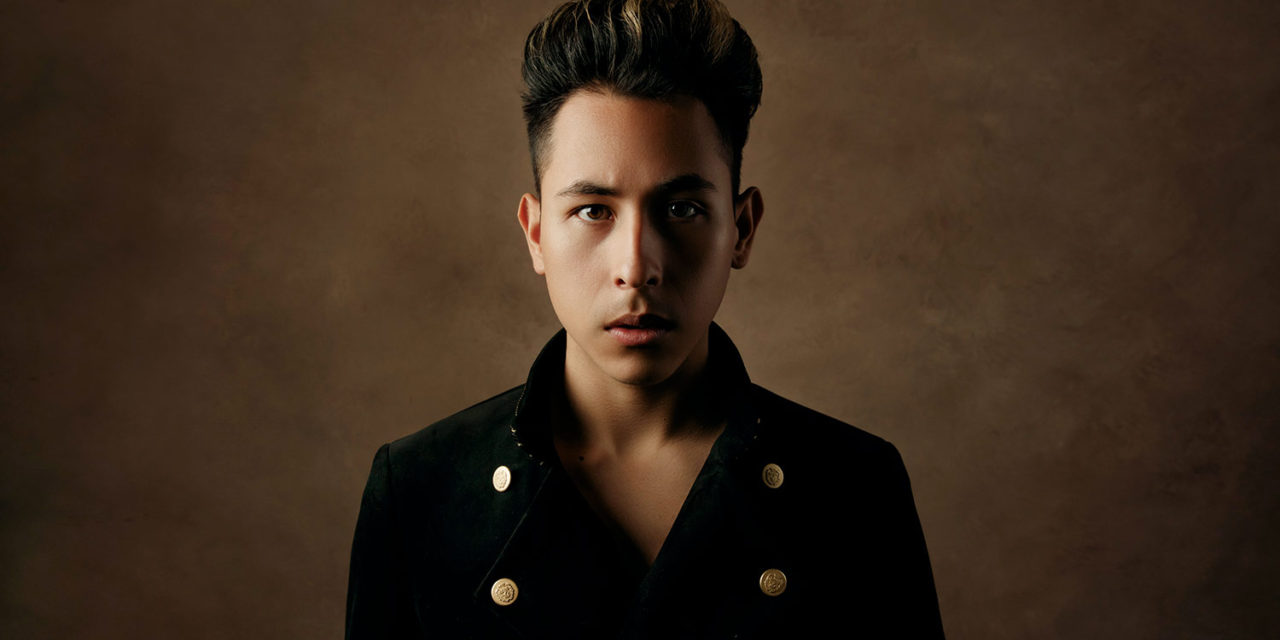
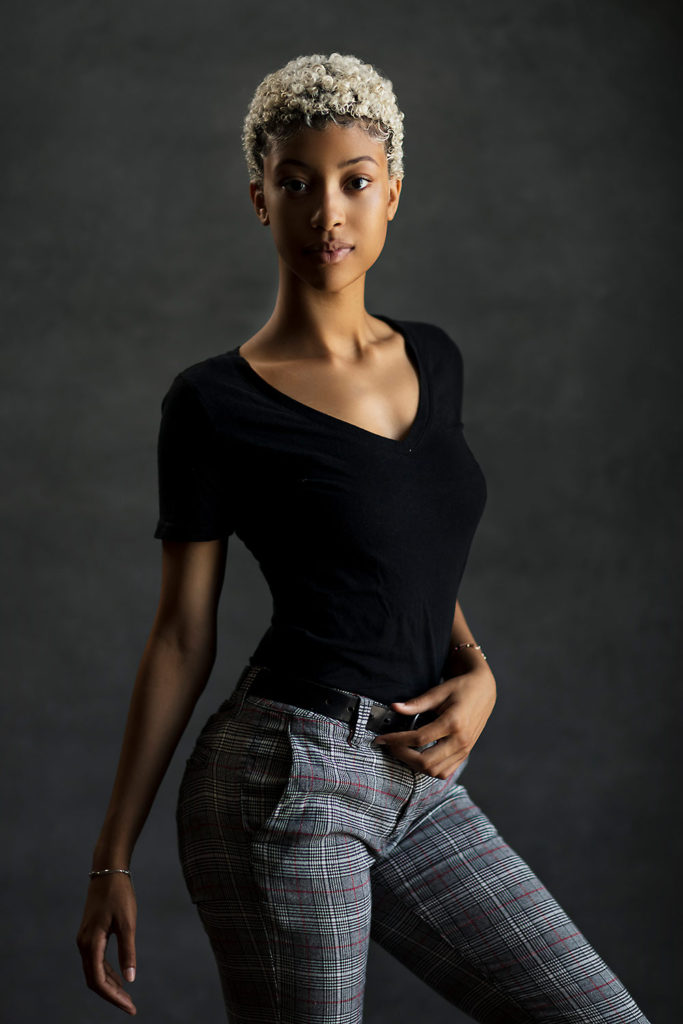
Camera: Canon EOS 5DS R | Lens: Canon EF 85mm f1.2L II USM
Window Light | f/2.2, 1/160s, ISO 250 | Photo by © Sergey Bidun
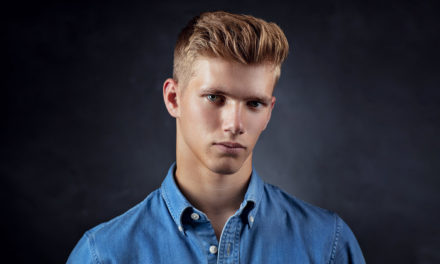
WHAT IS SPLIT LIGHTING?
Split lighting got its name from the way light and shadow show up on the subject’s face during a photo shoot. As the light source is at a 90˚ angle to the model – it’s as if it splits the face vertically into two equal parts. One side of the face is highlighted by a light source, while the other side is completely dark.
The Split Lighting may be not as popular as Rembrandt Lighting, Butterfly Lighting, or Loop Lighting technique, for example – but is one great way to add a unique look and feel to a photograph.
Split lighting is often used for creating a dramatic effect in portrait photography. Actors and models most often choose these portraits as they offer a sense of mystery and artistic feel.
Read how different lighting patterns are used in Contemporary Fine Art Portrait Photography.
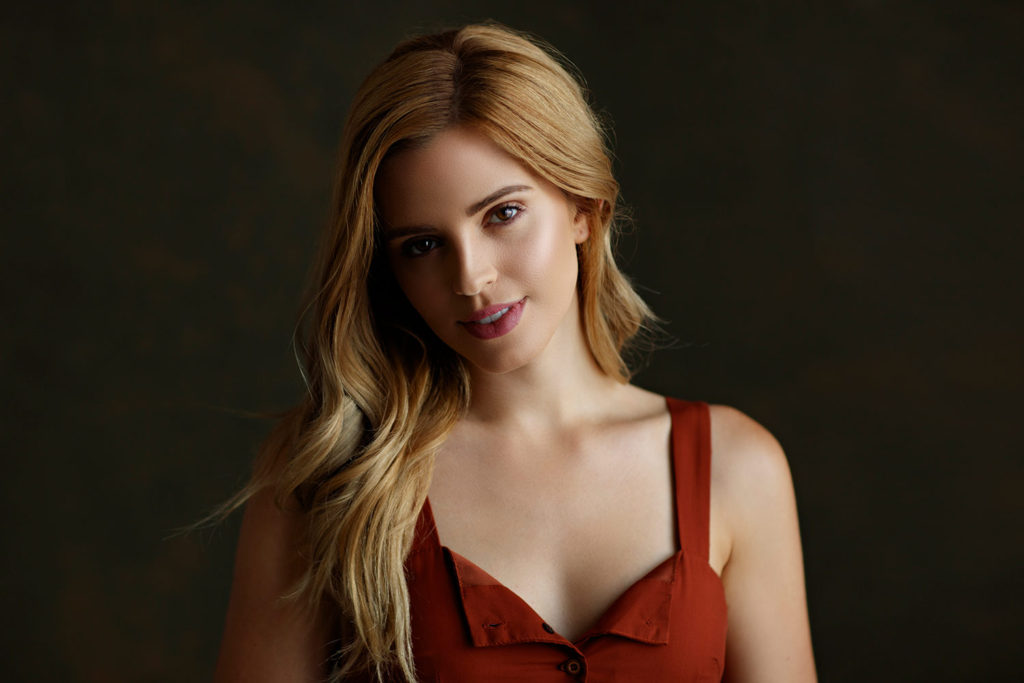
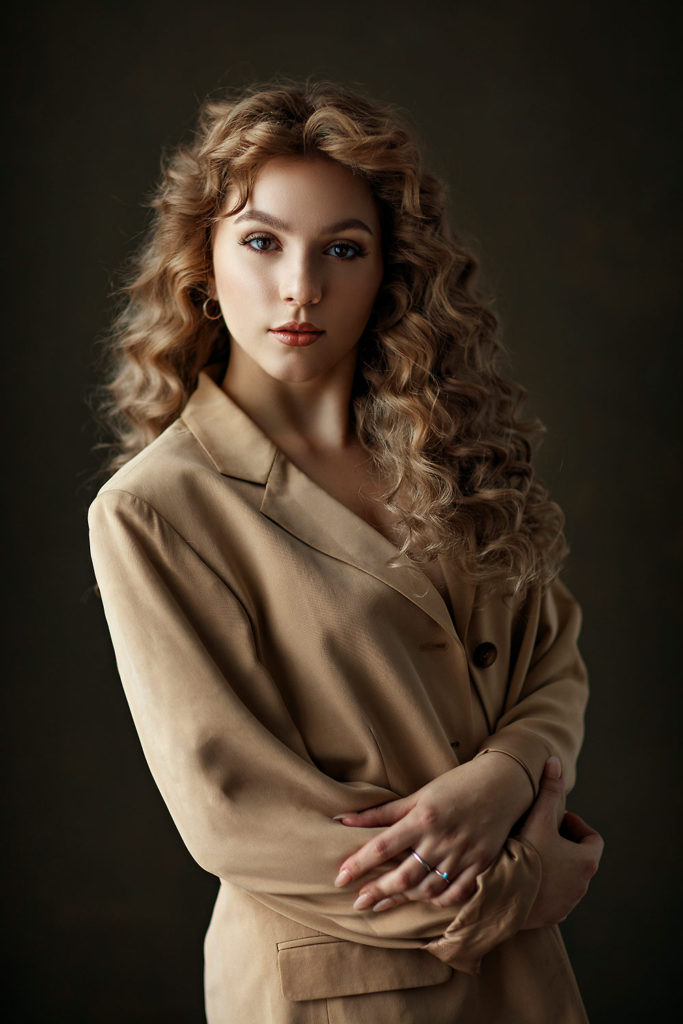
Camera: Canon EOS 5DS R | Lens: Canon EF 50mm f/1.2 L USM Lens
Window Light | f/1.8, 1/640s, ISO 320 | Photo by © Sergey Bidun
SIMPLE SPLIT LIGHTING SETUP
Due to the nature of the dramatic effect, split lighting tends to be more of a masculine pattern. You’ve probably seen men acting headshots or personal branding portraits with harsh shadows on the face. This type of lighting adds a sense of self-assurance and highlights facial features very well.
Despite being more of a dramatic-type of lighting setup, it’s worth trying out this technique in female portraits. This type of light might add the amount of dimension you wanted to include in a woman portrait.
Split lighting set up is believed to be dated back to the early days of Hollywood since it was the style of light used to communicate drama to viewers. The butterfly lighting setup was also one of the widely used light patterns in old Hollywood times.
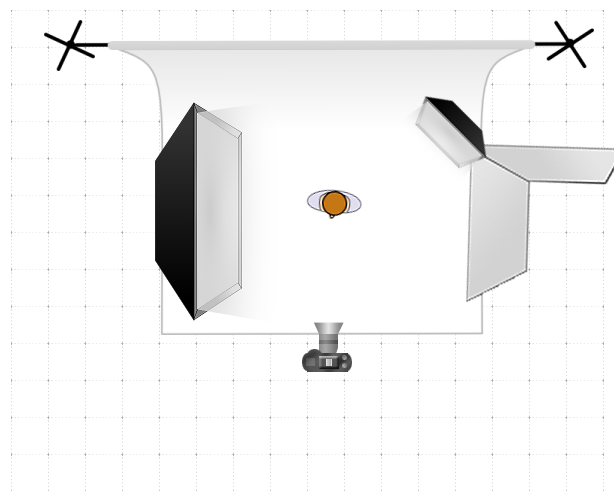
It’s really not hard to achieve a split lighting technique, even for a beginner photographer. For the basic setup, you will only need a single light source – either artificial light, window light, or sunlight. You also need a good eye to make sure the light source is hitting at a perpendicular angle.
PHOTO GEAR FOR SPLIT LIGHTING TECHNIQUE
The basic split lighting pattern requires very minimal photography equipment. You will need a key light, a camera, and a reflector or a V-flat – an optional tool for achieving different effects in portraits. Split lighting technique is often used in contemporary fine art photography.
KEY LIGHT
To achieve a split lighting pattern, you will need a quality light source – it can be either artificial or natural light. What’s unique about this lighting technique, photographers can get pretty amazing results by using just a natural light source.
If you don’t have a strobe or a Speedlight, you can still practice this light setup. You can shoot outdoors at the sunset time, or even indoors if the window light is a strong light source.
All you have to do is position the subject at a 90˚ angle toward the light until you distinctively see half of the face in light and another half in full shadow. This creates a split lighting technique.
ARTIFICIAL LIGHT
For studio and indoor photoshoots, I would suggest using an artificial light source. One of the top benefits of those is the ability to control the intensity and position of the light. For my studio photography, I prefer working with Profoto B1 Monolight, but you can use pretty much any strobe, Speedlight, or continuous light, such as video light.
Whenever you are working with a flash – consider adding a modifier to soften the light in your portraits. There are different types of modifiers, such as a beauty dish, a softbox, an umbrella – pick what works best for your job, and the budget. My favorite modifier for portrait photography is a Profoto beauty dish – it’s one of the best tools for creating high-end portraits.
When searching for an ideal flash, consider getting a key light that will work for your other lighting setups. Depending on the style of photography that you do, one flash might work better than another kind. Also, always make sure that your flash and triggers are compatible with your camera model.
Camera: Canon EOS 5DS R | Lens: Canon EF 24-70mm f/2.8L II USM
f/14.0, 1/200s, ISO 125 | Photo by © Sergey Bidun
Light: Profoto B1 500 AirTTL System
CAMERA & LENS
Portraits with split lighting don’t require a specific type of camera or lens. Any Canon, Nikon, Sony, or another brand of DSLR or mirrorless camera will work. Learn the camera settings and how to take better pictures with the photo gear that you have.
When choosing a lens, go for the ones with a focal length of 50mm and up. Some of my favorite prime lenses to use for studio portraits are Canon 50mm 1.2 and Canon 85mm 1.2. If you use a wider lens such as 35mm, you will start seeing distortions in your images.
REFLECTOR
Using a reflector in the split lighting technique is not a requirement, but is something worth considering. A reflector is a very affordable light shaping tool that can really add to your shot and significantly improve it.
After you position the flash for creating split light, you will notice the shadow side of the face completely dark. In order to still have some details on that side of the subject’s face, try adding a reflector. Pay attention to how much softer the shadows become as reflector gets closer to the subject.
A reflector is a great tool to shape and balance the light in portrait photography. For this specific light pattern, you will need an assistant to hold the reflector at just the right angle. Practice until you get the result that you are looking for.
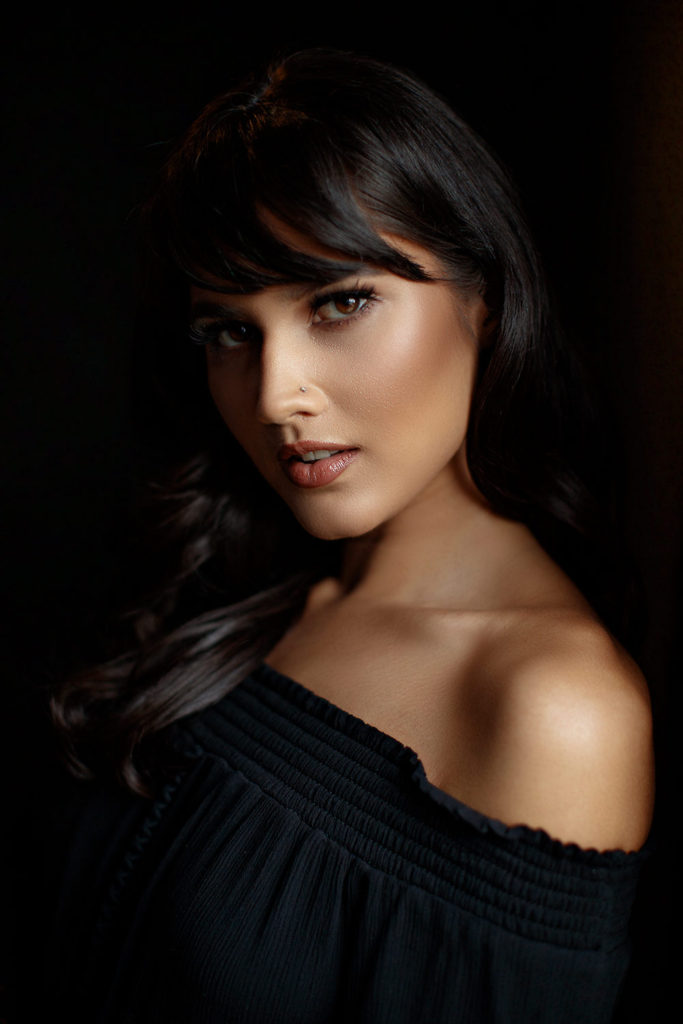
Camera: Canon EOS 5DS R | Lens: Canon EF 50mm f/1.2 L USM Lens
Window Light | f/1.8, 1/320s, ISO 250 | Photo by © Sergey Bidun
V-FLAT
A V-flat is also an excellent way for shaping light, especially window light in the studio. In case you are not familiar with it, a V-flat is two pieces of 4’x8′ foam board that are connected on the long edge to create a hinge.
The V-flat has a white and black side, which is is ideal for portrait photography. If you are looking to bounce window light and want it to be soft and smooth, place the white side of the V-flat on the side opposite to the window.
When looking to create a split lighting pattern with an added V-flat, position it at an angle that produces even light on one side of the face and shadows on the other. Black color absorbs the light. The black side of the V-flat is used when you want to create contrast in your portrait.
The primary benefit of a V-flat is that it can stand on its own, and you don’t need an assistant to help with it. It’s also easy for transporting since it folds down to 4’x4′ size board, and you can take it to any on-location photoshoot.
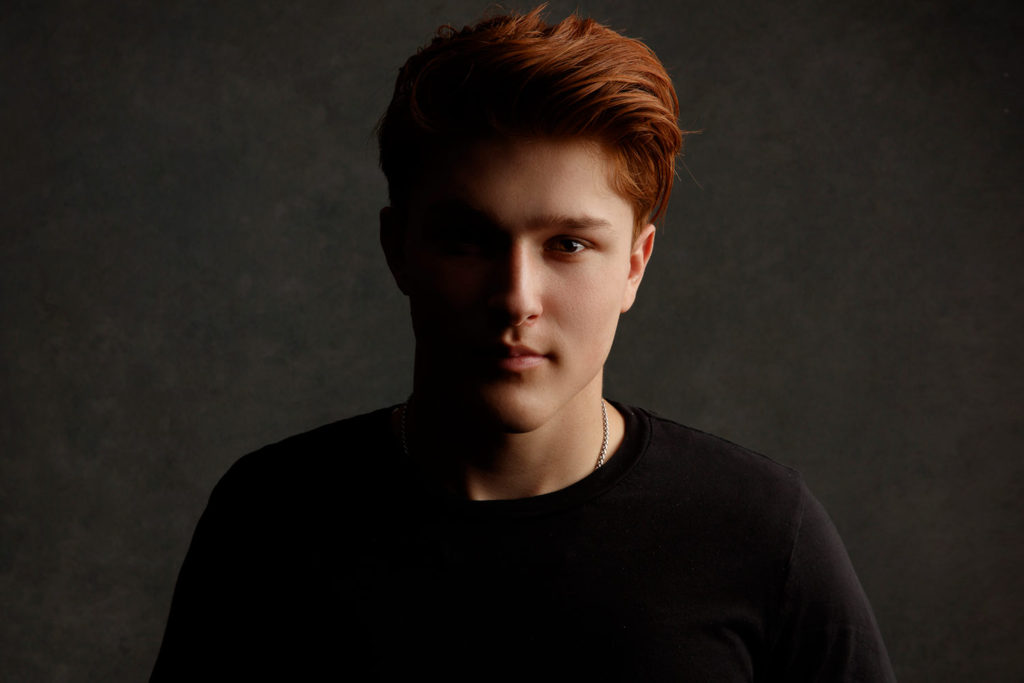
Camera: Canon EOS 5DS R | Lens: Canon EF 50mm f/1.2 L USM Lens
Window Light | f/1.8, 1/400s, ISO 200 | Photo by © Sergey Bidun
HOW TO SET UP SPLIT LIGHTING PATTERN
Now that we’ve discussed main elements and photography gear that split lighting requires, let’s talk about the way split lighting is set up.
Split lighting belongs to a category of the basic lighting setups since only a single light source is necessary. Position the light at a 90-degree angle to the left or right side of your subject.
- Flash – If working with a flash, I suggest using modeling light while you’re setting up so that you can see where the shadows and highlights show up on the subject’s face. It may differ from person to person, depending on the face and nose shape. Once you are done setting up for the shot, turn your light source to the flash mode.
- Video Light – If you are using a video light, it’s easier to see lights and shadows on the face since it’s a continuous light source. I love working with my Stella Pro video light – it’s portable and gives a high-quality key light.
- Window Light – Window light can serve as your main source of light – you just have to be able to see the light visually and adjust the subject’s position accordingly. This type of lighting is not as clearly defined as an artificial light source, for example, but you can get amazing results nevertheless.
- Sunlight – Sunlight is another no-cost light source available to the photographers. Keep in mind that the sun needs to hit the face at an angle that “splits” the face into highlight & shadow sides. The best time for this would be at sunset time when the sun is low.
SHOW HIGHLIGHT AND SHADOW SIDES
You can choose to work with any lighting, but the goal in achieving a split lighting pattern is to get that defining line between the highlight and the shadow side in the center of the model’s face. If you can get the eye – from the shadow side of the face – lit up, you’ve nailed the split lighting technique.
Adding a modifier will help you to diffuse and soften the light from the flash. Consider using a modifier if the portrait is coming out too dramatic or contrasty.
A reflector or a V-flat are both great tools for bouncing the light in portrait photography. If you are going for a specific look in your picture and just need to shape your light a bit – a reflector is an excellent tool for that.
CONCLUSION
If you’re fascinated with dramatic portrait shots, give split lighting a try. This lighting technique is ideal for actor and fashion photography, commercial photography, and just adding a dramatic effect to portraits.
Being one of the simplest light setups, split lighting is perfect for experimenting with natural and artificial light. All you need is a light source, your camera, and someone to photograph. Position your subject so they are at a 90-degree angle to the key light, paying attention to how the light falls on the face. We are looking for the light source to split the face equally into half-light and half-shadow sides. This is the split lighting technique, simple, isn’t it?
Now that you are familiar with the Split Lighting setup, you may want to learn more about other lighting techniques such as Rembrandt Lighting or Butterfly Lighting that we discuss in these articles.
IF YOU FOUND THIS POST HELPFUL AND INFORMATIVE PLEASE SHARE IN YOUR SOCIAL MEDIA.
Photographer: Sergey Bidun
Written by Maria Bidun
![Black and White Portrait Photography [Ultimate Guide]](https://bidunart.com/wp-content/uploads/2020/04/Portrait183a-440x264.jpg)