In photography, exposure is the amount of lighting that falls on the sensor of the camera for a specific period of time. The camera exposure settings are responsible for this amount. The primary purpose of the correct exposure in photography is to transmit the photographic image of the subject as it is seen by the human eye, or as close to it as possible. By changing the exposure value, you can get a darker or lighter picture.
If we exclude additional factors that may affect the image, the exposure can be described as brightness. Camera light meter helps you to determine if your image is underexposed or overexposed.
Every amateur photographer and, especially, a professional photographer should be able to determine and set this important setting independently. If you set your camera to auto settings – the camera will make all the setting selections for you, but they are not ideal.
Let’s discuss factors that affect photo exposure and how you can use this knowledge to take better pictures.
This post may include affiliate links. Please read our disclosure policy. [022]
FACTORS AFFECTING PHOTO EXPOSURE
You can change the amount of light falling on the sensor of the camera by setting the following configurations: Shutter Speed, Aperture, and ISO.
- Shutter speed indicates the amount of time the shutter of the camera is open, as the light falls on the sensor. This configuration can be a whole or fractional number. All camera models use a standardized number series. A series starts with thirty seconds and ends with its thousandths. The shortest shutter interval for cameras is 1/8000 second. For simpler cameras, it may be smaller.
- Aperture changes the amount of light recorded by the sensor of the camera. For this purpose, the lens is equipped with a technical device that can smoothly adjust the opening. When setting the aperture to the minimum digits position, the lens is fully open. Depending on the type of lens, these can be f/1.2, f/2.0, f/2.8. With f/16, f/22, or f/32 aperture, the light will enter the image sensor through a small hole in the center of the lens, which reduces the amount of light.
Exposure in photography is primarily determined by these two parameters, which form an exposure pair.
- In addition to these values, a third factor is used that affects exposure. This is the sensitivity of the camera’s sensor or the ISO. Setting a high level of sensitivity allows for smooth shooting under challenging conditions.
High ISO setting negatively affects the quality of the image, since with increasing sensitivity, digital noise increases throughout the field of the frame. The image is as if covered with colored dots, the number of which increases with increasing sensitivity.
USING MANUAL MODE IN PHOTOGRAPHY
The camera body has controls that, in manual mode, allow you to change the numerical values of all three values. When choosing the exposure in the manual mode of the camera, the photographer sets all the parameters on his own, as the automation is turned off.
In the semi-automatic modes of the camera, it is enough to set one of them, and the rest will be set automatically. One example of that is shooting in aperture priority mode. You can learn more about shooting in Aperture Priority Mode from this post.
HOW TO CHOOSE THE RIGHT EXPOSURE IN CAMERA
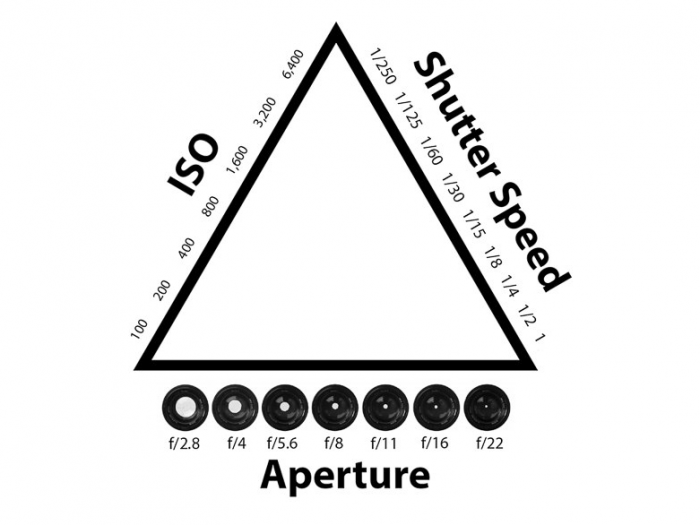
All three values affecting the exposure are interconnected, so in the process of photo shooting, they can not be analyzed separately. In photography, it is common to regard to ideal exposure as a triangle with equal sides. When you change any of the three values, the symmetry is broken, and to restore it, you need to change either one of the remaining settings or both at once.
The correct exposure in the photograph has the following characteristics:
- Good tone distribution;
- In-depth enhancement of details in the shadows;
- Detailing in bright areas.
In the photo, you can see the smallest details of the image, both in the brightest areas and in the shadows. A correctly taken photo does not need brightness correction using photo retouching. If the main values of the camera can be set to the shooting conditions, then the ISO is best left to a minimum.
KEEP A LOW ISO
Experienced photographers use increased ISO only in the most extreme cases. Most often, this is done in cases where the main exposure values are not enough for shooting under challenging conditions.
When you are shooting in low light conditions such as at night, or in a very poorly lit room, you might want to use higher ISO if you don’t want to miss the moment. Learn how to take portraits at night without using flash from this post.
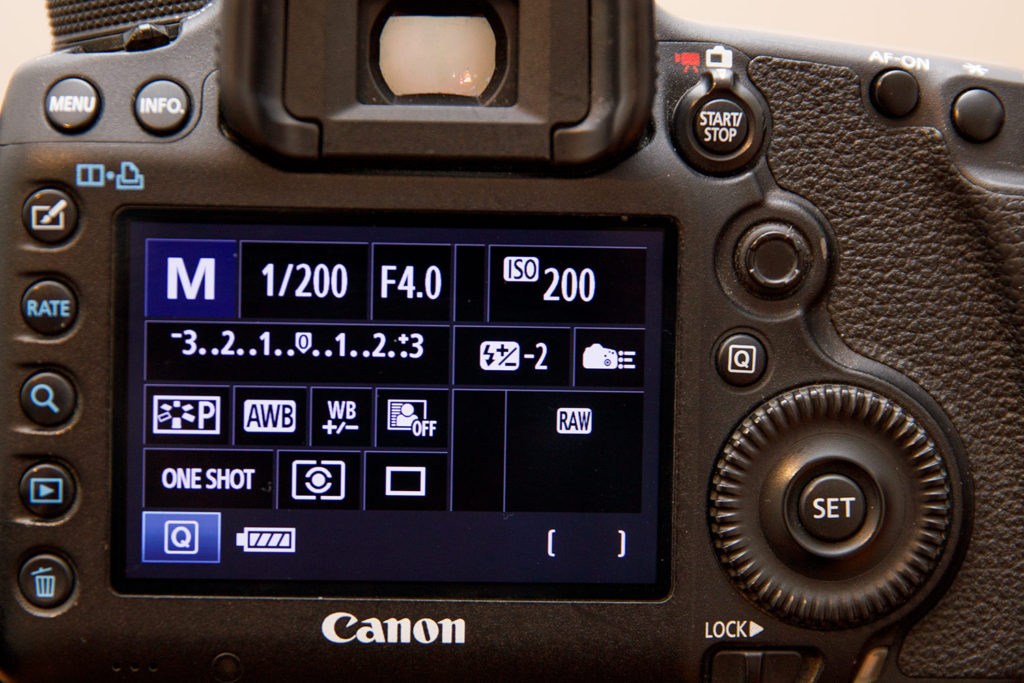
The cameras have an electronic exposure light meter. The display shows a scale with a zero in the center and with marks (+) and (-) left and right. If the exposure in the camera is set correctly, the indicator arrow is at zero. When it is in one of the side sectors, you need to change the main parameters to set it to zero. If shutter speed and aperture are not enough for this, then you have to adjust the ISO.
LEARNING TO SET UP CORRECT EXPOSURE
Making the right exposure choice comes with experience when the amateur photographer works a lot in manual mode. To correctly understand the exposure in photography, you need to know that the same image quality can be achieved with different values of the camera settings.
To make this more clear, the term exposure number is used in photography. Different numbers of shutter speed and diameter of the lens aperture can correspond to one number. This is clearly seen on special tables. For example, the exposure number will be the same for the following values:
1/500 – f/2.8; 1/250 – f/4.0; 1/60 – f/8.0
Supposedly, the quality of the photograph should be the same for any combination of these values. A lot depends on the nature of the photoshoot as well.
It is better to set exposure as a primary setting when photographing a moving subject. This applies to sports, cars, birds, animals, and pets. In addition, when you are specifically shooting water movement or clouds and want to show them in a smooth milky look – set the exposure first.
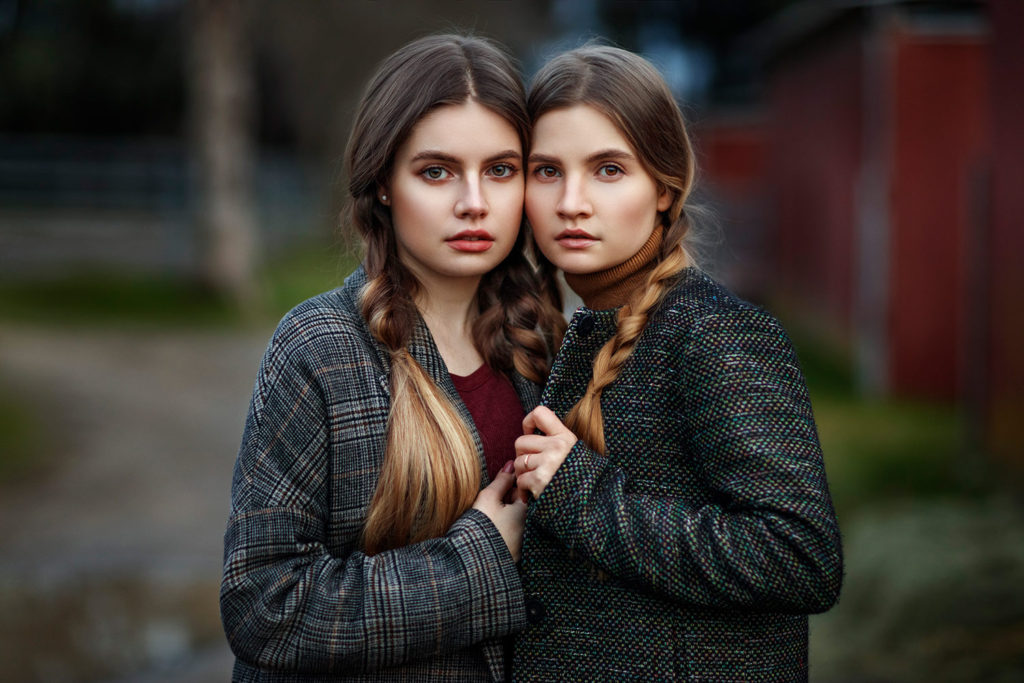
In portrait photography, the exposure setting is secondary after the aperture. When you want to have a beautiful blurry background in a portrait, set the aperture first, and adjust the exposure as needed.
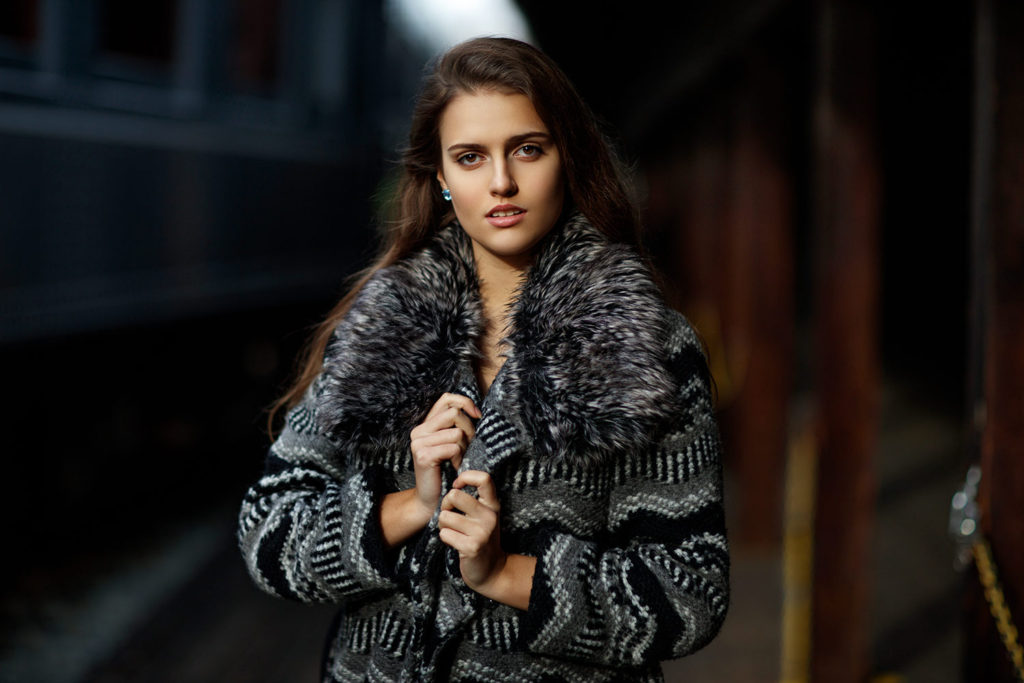
Camera: Canon EOS 5DS R |Lens: Canon EF 85mm f1.2L II USM
Sky Natural Light | f/1.8, 1/320s, ISO 800 | Photo by © Sergey Bidun
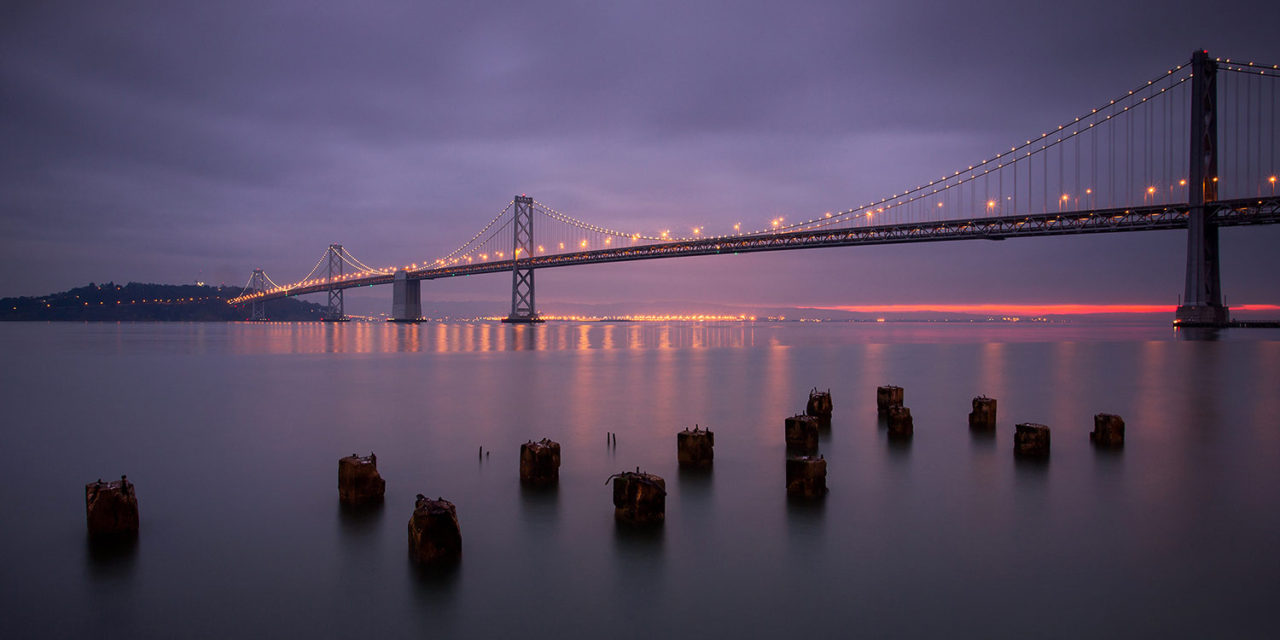
EXPOSURE IN LANDSCAPE PHOTOGRAPHY
When photographing scenery landscapes, the aperture of the camera lens should be lowered by setting large numerical values of the aperture. The f/16 or f/22 values, in combination with the correctly selected shutter release interval, will allow you to get everything sharp in the image and perfectly exposed.
You have to be careful that since you are photographing with the high aperture, your exposure is going to be in seconds. It’s impossible to shoot handheld with such a long exposure, so you need to make a decision to either raise up ISO or shoot with a tripod.
Although the correct exposure in photographs mostly depends on two camera values, experienced photographers consider the aperture more important, so it is set on the first basis. Then, depending on the aperture and characteristics of the subject, we select the shutter speed.
If necessary, the settings are adjusted based on the readings of the exposure meter, and the ISO raises. Initially, a minimum sensitivity is applied, which allows delivering a high-quality picture with a minimum amount of noise.

Camera: Canon EOS 5Ds R | Lens: Canon EF17-40mm F/4L USM
Natural Light | f/20, 312sec, ISO 50| |Lee ND Filters
Photo by © Sergey Bidun
HISTOGRAM CHART
A histogram is an essential tool for evaluating the exposure. All DSLR cameras allow you to see a histogram when viewing pictures. Sometimes the histogram display has to be activated using the menu.
A histogram is a graph that displays the number of pixels of varying brightness for a given image. The horizontal axis indicates the brightness level, from the minimum on the left to the maximum on the right side. The vertical axis shows the number of pixels for each tone.
Large areas of the same tone in the image, form peaks on the histogram graph. The height of the peak depends on how many pixels have a similar brightness. The more similar in tones the pixels are, the narrower the peaks.
Light images move the histogram to the right, and dark ones to the left. An image containing a full tone gradient from black to white will have a histogram that extends from the left to the right.
Pixels lying within the histogram window are correctly exposed. If they are coming to the right or left edge of the window, this means going beyond the dynamic range.
PIXELS ON THE LEFT SIDE
A large number of pixels at the left edge indicates black shadows lacking in detail. If the underexposure is no more than two or three steps, you can try to brighten the shadows in the RAW converter, but it will cost you an increase in the noise level. In essence, the stretching of the shadows during post-processing is somewhat similar to raising the ISO when shooting.
In many pictures, black shadows are not a problem and look quite natural. This is due to the fact that the human eye better distinguishes details in highlights than in shadows, and therefore it does not expect much detail from the shadows in the photo.
PIXELS ON THE RIGHT SIDE
If the histogram rests on the right edge of the window, forming a thin peak, this tells us that the lights are hopelessly overexposed. During overexposure, the photo tones are displayed as pure white color without a hint of detail.
Digital photography does not tolerate overexposure. RAW converters allow you to restore minor overexposure, but this results in color distortion and the appearance of halos.

MONOCHROME AND COLOR HISTOGRAM
The histogram can be monochrome and color. The digital camera’s sensor generates a three-color image, and therefore we recommend using an exclusively color (RGB) histogram to evaluate exposure, reflecting information about the red, green, and blue color channels.
The black-and-white histogram shows either the average brightness value in three channels or even takes information exclusively from the green channel. It can easily hide overexposure on the red or blue channel. As a result, the accuracy of exposure estimation drops to ± 2 steps, which is completely unacceptable, and an automatic exposure meter usually does not allow such significant errors.
So why not evaluate the exposure accuracy of the shot visually? After all, you can just look at the camera screen. You can do that. Moreover, this is the only reasonable way if your camera offers you only a black and white histogram. Your eye will be more accurate.
The overexposure in individual channels will give you unnatural color distortion in bright areas of the frame. But keep in mind that a full-value, color histogram gives much more complete control over the exposure. Learning how to use it is easy, and your reward will be the elimination of incorrectly exposed images.
HOW TO GET CORRECT EXPOSURE IN PRACTICE?
What could be easier?
- Take a picture;
- Take a look at the histogram;
- If the exposure is right – you got the shot;
- If the histogram indicates overexposure or underexposure, use light exposure meter to increase or decrease your exposure.
To get the correct exposure when shooting with a digital camera, in most cases, it is enough to follow a simple and universal rule: give as much exposure as possible without clipping. Clipping is the result of capturing an image where the light intensity in a particular area falls outside the minimum and maximum strength in the histogram chart.
Exposure in digital photography is argumentative. On one hand, the larger the exposure, the higher the image quality due to better halftone display and lower noise levels. On the other hand, for a digital picture, there is nothing worse than overexposure of significant objects.
The shadows that are too dark are still quite possible to brighten, although at the cost of some quality decline. But it is almost impossible to restore the overexposed colors.
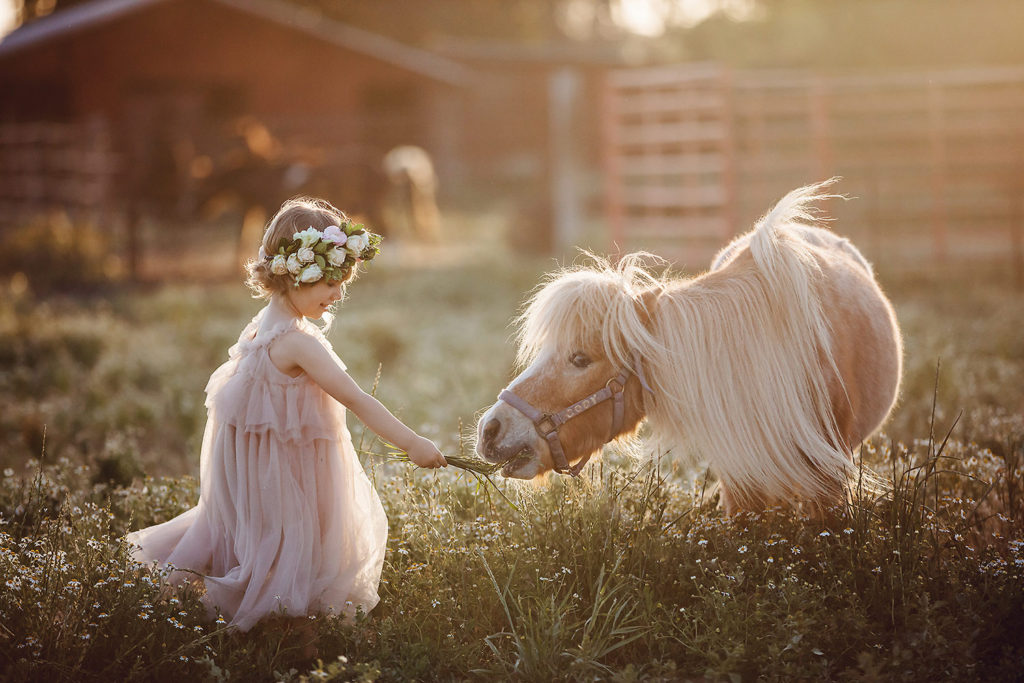
Camera: Canon EOS 5DS R |Lens: Canon EF 85mm f1.2L II USM
Sun Light | f/1.6, 1/2500s, ISO 200 | Photo by © Sergey Bidun
PROS & CONS WITH CERTAIN CAMERA EXPOSURES
You need to bring the histogram as close as possible to the center. Ideally, this achieves great details in the shadows, but at the same time does not allow lights to be overexposed. However, as the photoshoot conditions are rarely ideal, certain difficulties may await you when trying to achieve optimal exposure.
BACKLIGHT
When shooting in backlight, a beautiful luminous halo often appears around objects. Its intensity is much higher than the brightness of the dark side of the object facing you. An attempt to expose the frame to the light will lead to a very strong general underexposure. In this instance, it’s allowed for the light contour to be touching the right edge of the histogram. The subject’s expression will not be affected by the lack of detail too much.
The backlight is often used in outdoor photography at sunset time for seniors, families, or couple’s shoots. Pictures with beautiful backlight are one of the most sought after in portrait photography. You can read more about our tips for Backlit Portrait Photography here.
Camera: Canon EOS 5DS R | Lens: Canon EF70-200mm f/2.8L IS II USM
Back Sun Light | f/2.8, 1/2000s, ISO 800 | Photo by © Sergey Bidun
VERY BRIGHT OBJECTS IN THE FRAME
Setting exposure strictly by light is not always the best solution. Sometimes, to avoid clipping, you may need to reduce the exposure so much that the whole picture, except for individual bright spots, will drown in darkness. In fact, in such cases, it is quite possible to allow some overexposure. The sun flare, glare on the water, or metal surfaces do not need details. You may ignore such things and expose the scene as if they weren’t there.
Also, clipping is perfectly appropriate when shooting objects on a white background. In this case, it is crucial for you to correctly expose the object itself. If the background is blown out, no worries – you won’t have to lighten it afterwards.
Camera: Canon EOS 5DS R | Lens: Canon EF 50mm f/1.2 L USM Lens
Window Light | f/2.2, 1/200s, ISO 500 | Photo by © Sergey Bidun
HIGH CONTRAST
If the scene contrast significantly exceeds the dynamic range of the sensor, then, trying to prevent overexposure in the lights, we are forced to leave the shadows completely black. This can happen if you are shooting on a bright day, but it is usually not a problem. In many scenes, shadows in which details are not necessary can be sacrificed. If this is unacceptable – wait for better light or try changing it yourself.
Sometimes the frames exposed to the light may look dark. If you shoot in RAW – do not worry about it. During post-processing, you can increase the brightness to the level you need, while maintaining the details in the highlights. If you shoot in JPEG, we advise you to achieve the correct exposure of the primary objects on the spot, but it may lead to the loss of detail in the light.
Camera: Canon EOS 5DS R |Lens: Canon EF 85mm f1.2L II USM
Sun Light | f/8.1, 1/250s, ISO 125 | Photo by © Sergey Bidun
LOW CONTRAST
The brightness range of some scenes does not exceed several levels of exposure. For example, during landscape photography in fog. If you move the histogram to the right, such sceneries may look too bright.
When shooting in RAW, this is normal. You will always have time to reduce the brightness to your taste, but at the same time, you will get better tonal separation in the shadows and a lower noise level than if you had initially shot with the “correct” exposure. If you shoot in JPEG, then you have no choice – immediately expose it as it should, even if the histogram does not reach the right edge.
We recommend you to read our Tips for Landscape Photography post if you are looking to improve your landscape photography skills.
Camera: Canon EOS 5Ds R | Lens: Canon EF17-40mm F/4L USM
Natural Light | f/22, 13sec, ISO 50| |Lee ND Filters
Photo by © Sergey Bidun
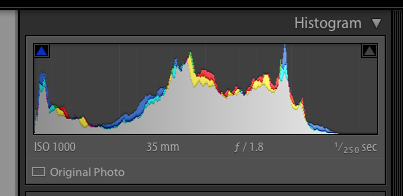
HIGH ISO
When you need to use slow shutter speed, and it is not possible to open the aperture any wider – increase your ISO sensitivity. In such cases, you can underexpose the image, provided that you shoot in RAW.
The fact is that a photograph taken with underexposure, and then brightened in a RAW converter, has about the same noise level as a photograph taken with normal exposure with a proportionally increased ISO sensitivity. The underexposure with post-processing lightening (digital push process) is equivalent to an increase in ISO. Both give the same gain in shutter speed, but a deliberate underexposure ensures the light from possible overexposure. This is important when you shoot in a hurry, and you have no time to look at the histogram of each frame.
*Portrait with higher ISO*
CONCLUSION
As you can see, observing simple rules, and sometimes breaking them, anyone can gain control over the exposure. Do not forget that these skills in no way guarantee that you will get an artistic photo, even if you have nailed the exposure.
The best advice tip we want to leave you with is to practice shooting in manual mode as much as you can. This will help you to get more acquainted with your camera, and you will see significant improvement in your photography skills.
IF YOU FOUND THIS POST HELPFUL AND INFORMATIVE PLEASE SHARE IN YOUR SOCIAL MEDIA.
Photographer: Sergey Bidun
Written by Maria Bidun