Beginner photographers often think about how to achieve that beautiful blur background in a photo. One of the biggest factors that attributes to this effect is the depth of field. Whether we are photographing with a shallow or deep depth of field will help to determine how much blur there will be in the background.
Nowadays, many smartphones support programs and apps that blur the background in the pictures. Anyone can do this by processing the photo in Photoshop or smartphone apps. However, this “digital” blur looks unnatural, impairs the quality of the image, and adds traces. We want to show you how to get a natural background blur using the camera lens and without using Photoshop.
A blurry background is not just a special effect or decoration. This is an artistic craft that came to photography, video, and film from paintings. By blurring the background, you can select and highlight the main object in the photo, and give the image more volume.
WHAT IS THE BEST CAMERA FOR A BLUR BACKGROUND EFFECT?
DSLRs and mirrorless cameras are the best for capturing background blur because their lenses are interchangeable. Photographers cannot get top-quality results only with the kit lens that comes with the camera. We have to choose lenses with particular properties for our photography projects.
Specific lenses considerably blur the background when adjusting their aperture – which controls the depth of field. We will discuss this in much more detail later in the post. Also, DSLRs and mirrorless cameras with interchangeable lenses have a large camera sensor that provides a high-quality image.
A large camera sensor has a lot of advantages over a small camera sensor such as a smartphone and point-shoot cameras. You will get high image quality with more details in highlights and shadows. A large camera sensor gives a better performance in low light and crispier clean images.
However, aspiring photographers still often experience difficulties in achieving that beautifully blurred background. What can be done to get that gorgeous bokeh background? Here are some of our top tips:
- 1 Use the right lenses for shallow depth of field
- 2 Use a proper focal length
- 3 Shoot with an open aperture
- 4 Create a distance between the background and the subject
- 5 Come closer to the subject
Let’s go over each of these points in detail.
This post may include affiliate links. Please read our disclosure policy. [012]
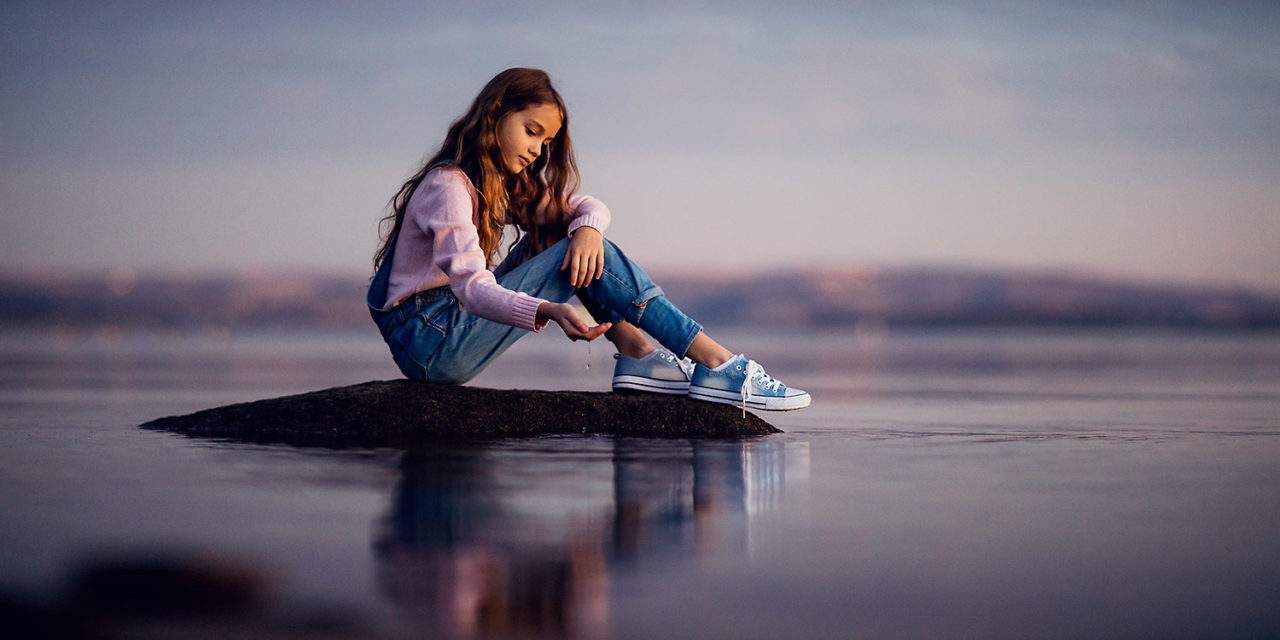
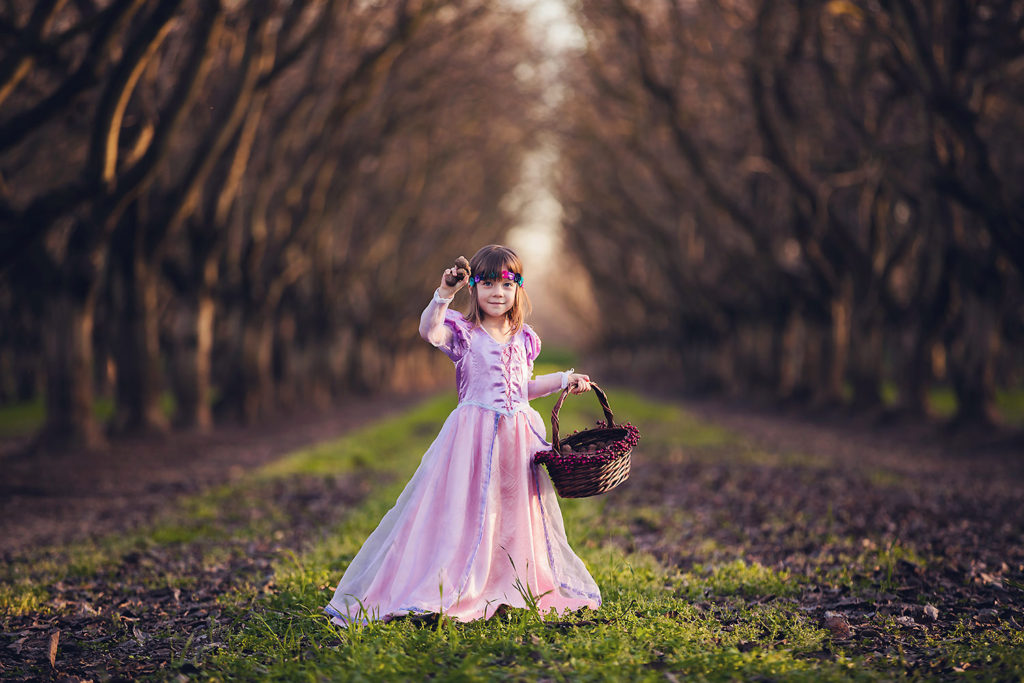
Camera: Canon EOS 5DS R | Lens: Canon EF70-200mm f/2.8L IS II USM
Foggy Natural Light | f/2.8, 1/160s, ISO 200 | Photo by © Sergey Bidun
USE THE RIGHT LENSES FOR SHALLOW DEPTH OF FIELD
When choosing the right lens for getting that beautiful soft bokeh it’s important that you get a fast lens. You will need to get at least 2.8 in maximum aperture diameter or faster. The maximum aperture diameter is also referred to as a minimum f-number, such as 1.2 or 1.4.
A fast lens will allow you to get the perfect blur in the background with a shallow depth of field. The main bonus of shooting portraits with a shallow depth of field is that it keeps the main subject in focus while giving a soft and pleasant bokeh to the background.
One of the best lenses for bokeh background is a fixed lens 85mm. The Canon EF 85mm f/1.2 is my go-to lens in every portrait photoshoot. This lens is more expensive but it gives a nicer bokeh and the image looks sharper. Canon EF 85mm f/1.4 is a bit cheaper and will create a similar effect as the f/1.2. The quality will be slightly lower, but still pretty good.
Any telephoto lenses such as 70-200mm f/2.8 (high-end quality lens) give a soft blur to the background. This lens is recommended for photographing kids and families, and especially when you shoot at full zoom. When photographing at the full 200mm zoom, you will get the softest background bokeh that all the photographers are after.
Canon EF 50mm f/1.4 is another great and affordable lens for beginners to start getting the background blur. If you are just starting out in photography, I suggest that you invest in this portrait lens and start practicing. The 50mm f/1.2 is much better because it provides better quality photos but is more expensive.
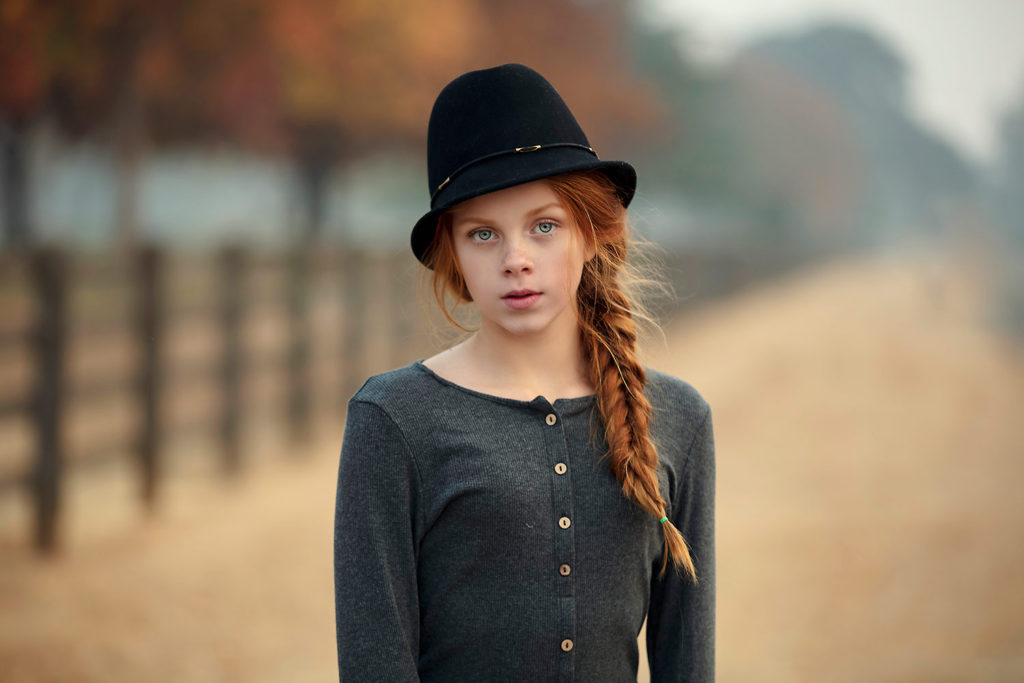
Camera: Canon EOS 5DS R | Lens: Canon EF70-200mm f/2.8L IS II USM
Sky Natural Light | f/2.8, 1/200s, ISO 800 | Photo by © Sergey Bidun
USE A PROPER FOCAL LENGTH
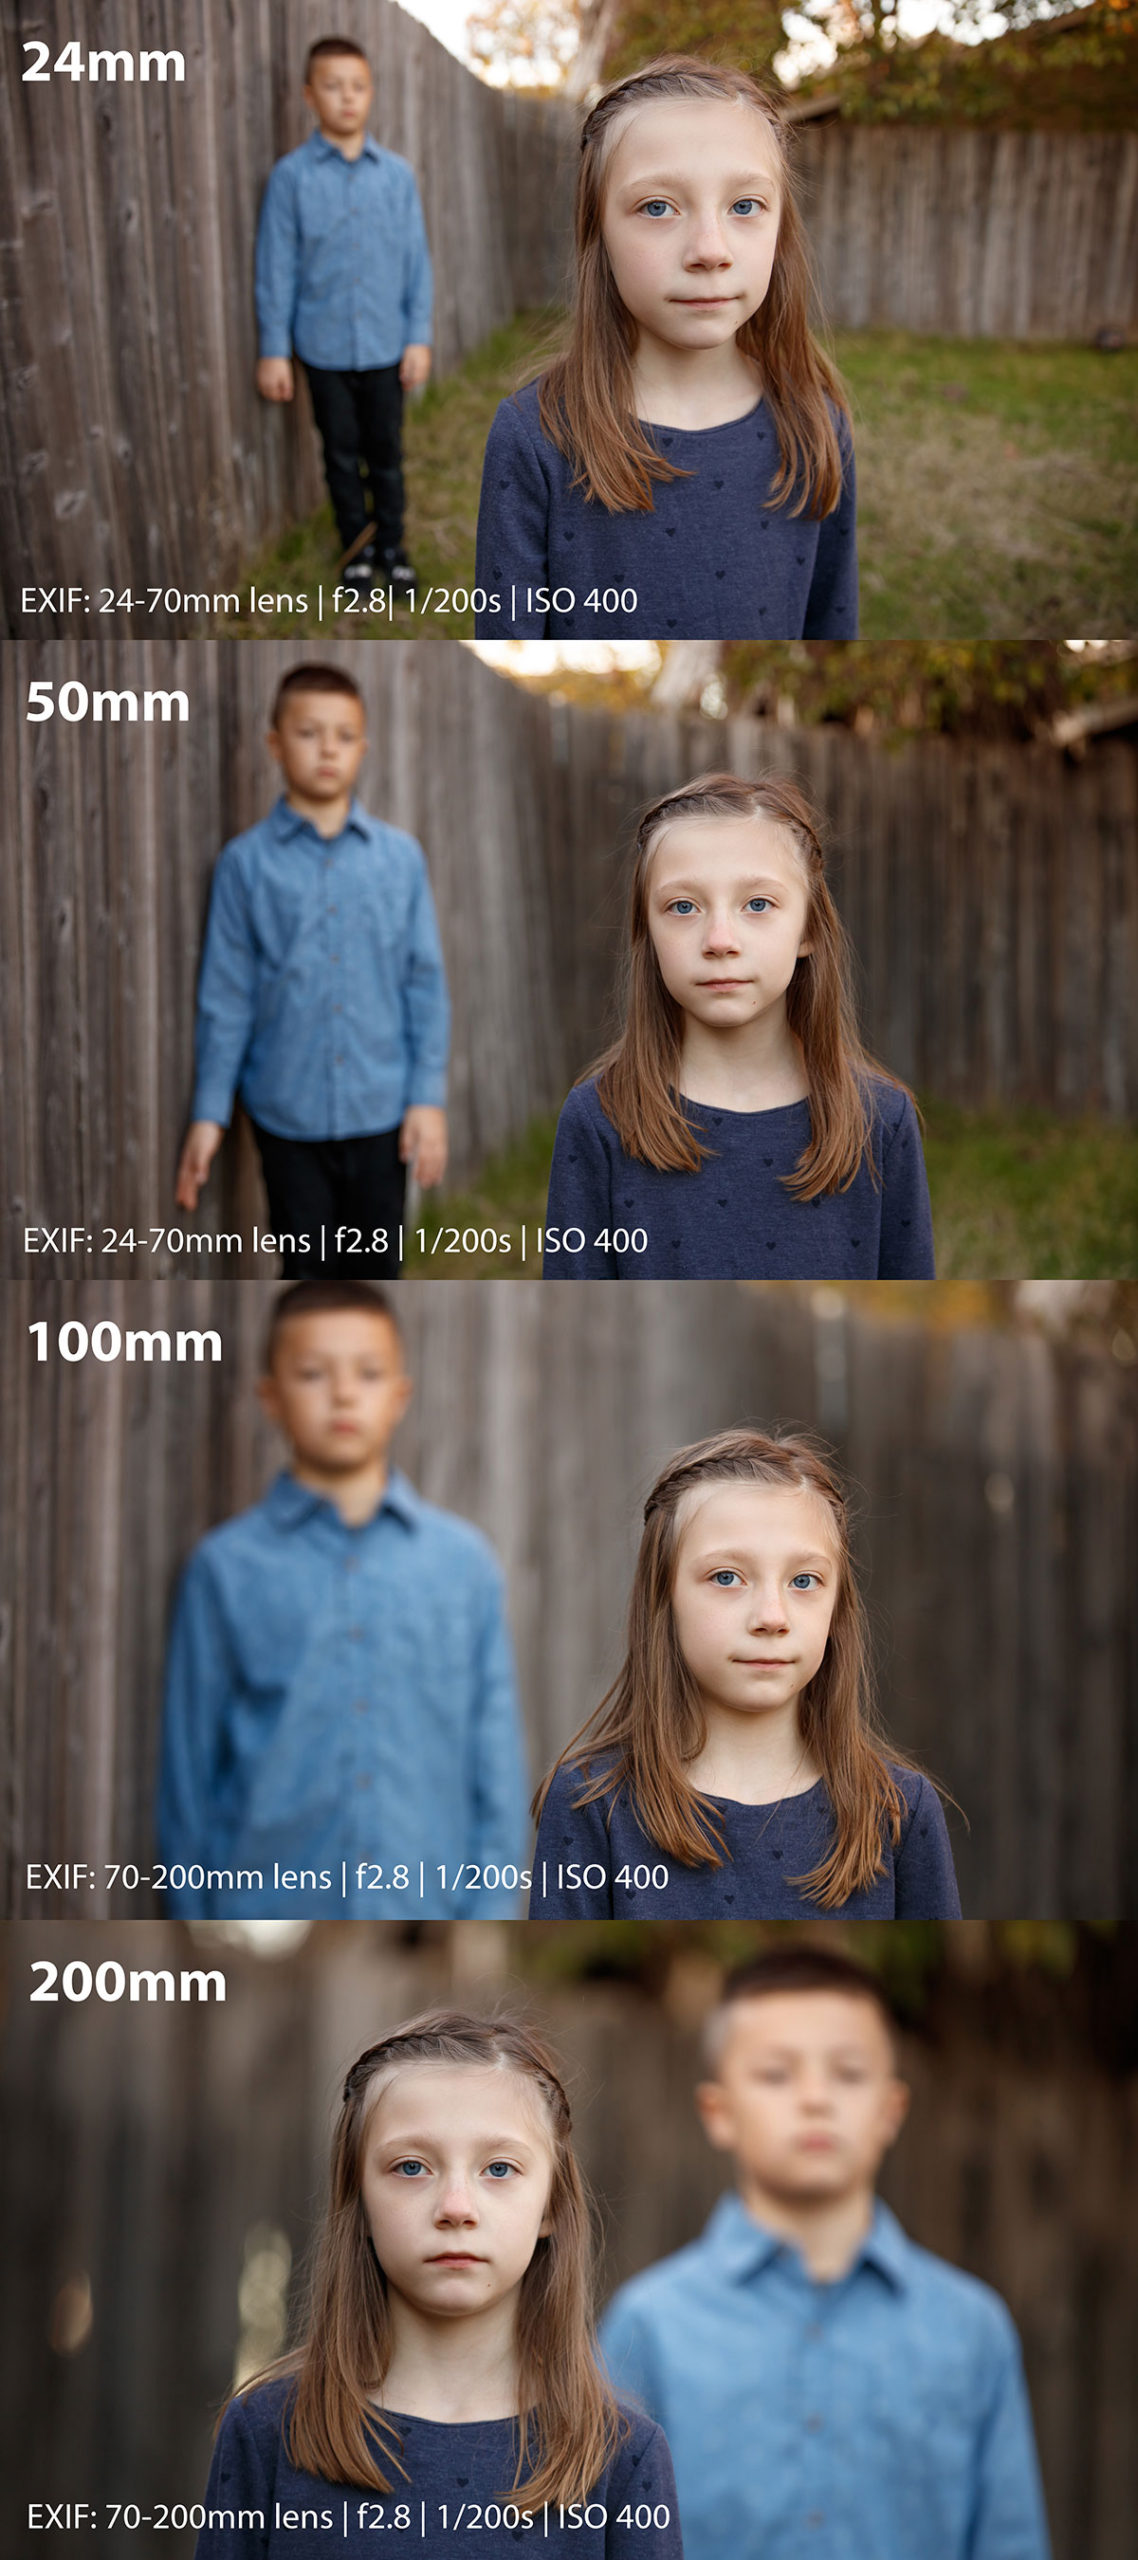
The depth of field also depends on the focal length of the lens. Speaking simply – from the zoom of the lens. When you shoot at the maximum zoom of your lens – the background will get more blurry.
The focal length of the lens is measured in the distance between the lens and the image sensor with the subject in focus. The focal length is usually stated in millimeters: 24mm, 50mm, 85mm, or 200mm. In the case of zoom lenses, both the minimum and maximum focal lengths are indicated, for example, 70-200 mm.
When zooming, we change the focal length of the lens. It’s pretty simple: more focal length – less viewing angle, the lens zooms in closer. Contrarily, the shorter the focal length of the lens, the wider the viewing angle.
During outdoor photo sessions, I like to get beautifully blurred backgrounds, and there are a few simple tricks that I use. When you have chosen the perfect background and positioned your subject in the right place, set your camera lens to maximum zoom, or longest focal length if you are using a fixed lens.
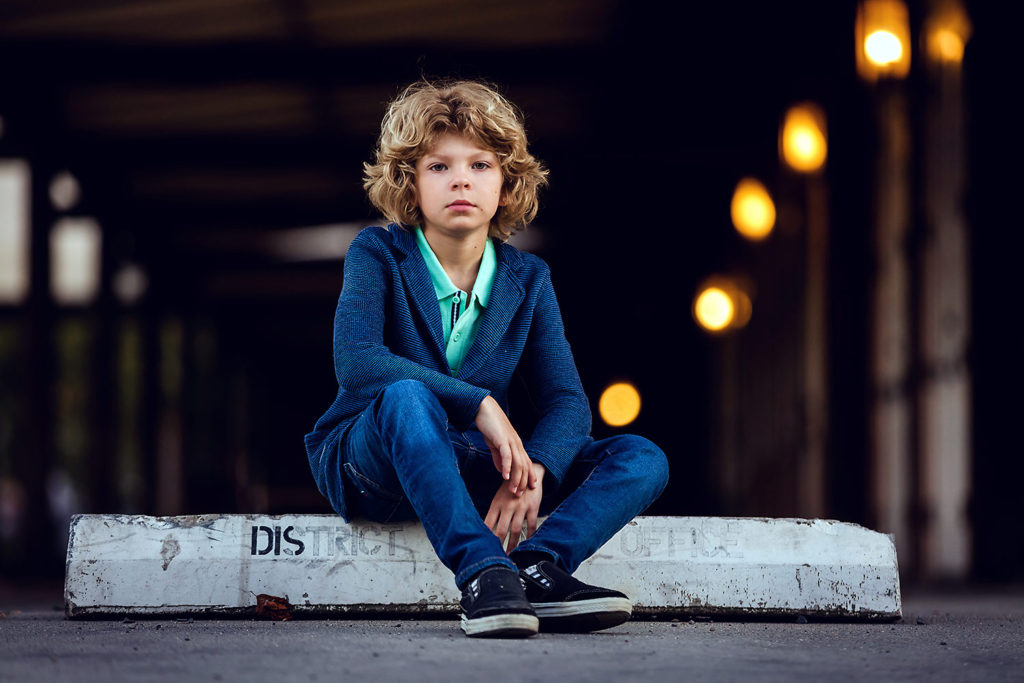
Camera: Canon EOS 5DS R | Lens: Canon EF70-200mm f/2.8L IS II USM
Sky Natural Light Photo by © Sergey Bidun
SHOOT WITH AN OPEN APERTURE
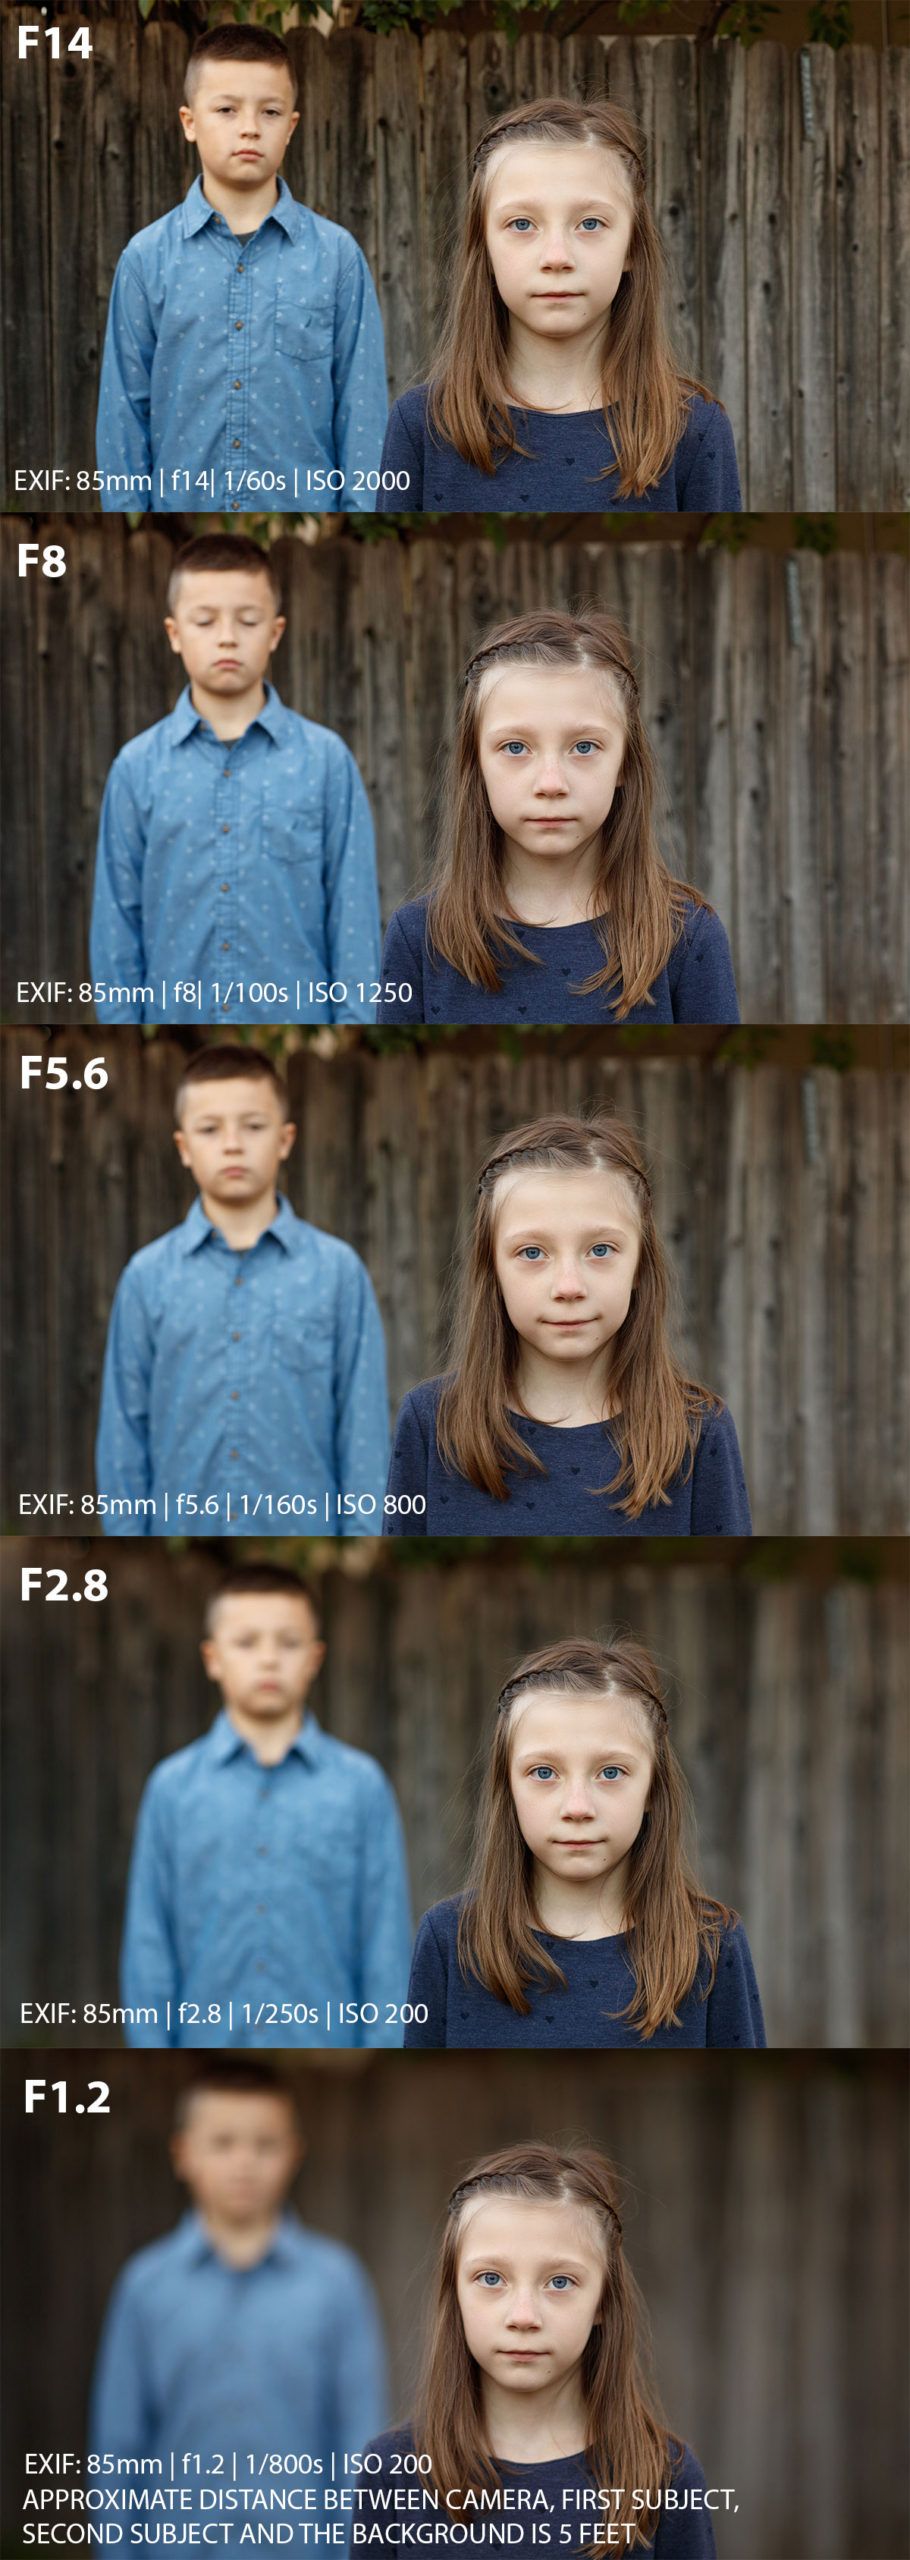
Another very important aspect affecting the background blur/depth of field is the aperture value. The bigger the opening/hole in your lens, the smaller is the depth of field. A bigger opening means that more light is entering the lens, which is labeled by f-stop in your camera. This directly affects how blurred the background will be – also called the bokeh.
One way to get better at learning the aperture is by setting your camera to aperture priority mode. This mode is labeled A or Av on your camera. If you are only photographing in Program mode still, one way to learn camera settings and improve your photographs is by shooting in A mode. You might want to shoot in aperture priority mode when you want to control the depth of field in your images. Find more tips and tricks on how you can get better at using Aperture Priority Mode in our detailed guide.
To get the best result from this effect, you need a camera lens that has a big opening in aperture value. I suggest using a lens with aperture values of f1.2 or f1.4. You can better grasp this concept by memorizing that the bigger aperture opening means a smaller f-stop and a more blurry background. The smaller your f-number the blurrier the background will be.
The aperture is one of the main reasons your background is not in focus. Having a blurry background significantly helps to bring attention to the main subject of the photo, whether it’s a portrait or some other object. It’s very important to understand how an open aperture helps to improve portraits, creating a sweet bokeh.
Camera: Canon EOS 5DS R | Lens: Canon EF 85mm f1.2L II USM
Sky Natural Light | Photo by © Sergey Bidun
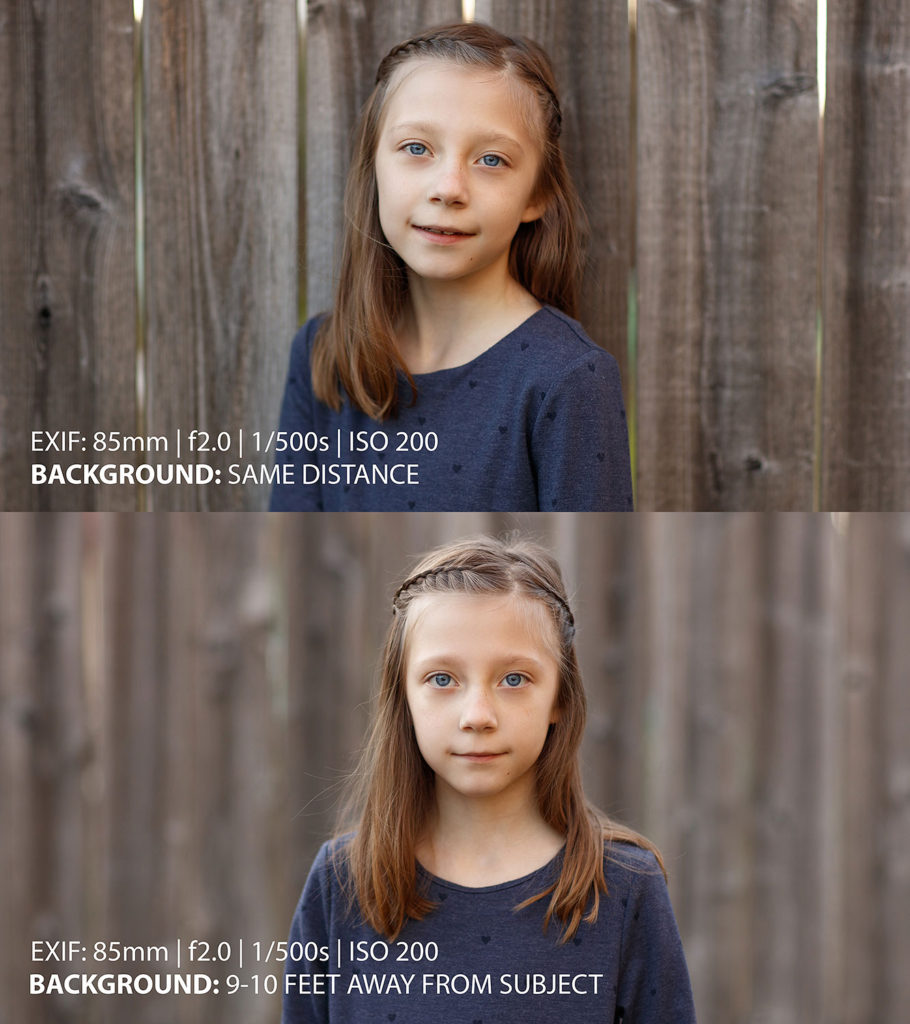
CREATE A DISTANCE BETWEEN THE BACKGROUND AND THE SUBJECT
Every lens is designed in such a way that when focusing, it is aimed at a certain distance. All objects located at this distance will be sharp. Therefore, if the background is almost at the same distance as your subject, it will have slight or no blur.
For example, if the subject is standing close to the wall, and you want to blur the background – ask her to take a couple of steps forward from the wall. When you create a distance between the background and the subject, you will immediately see the difference in the background blur. Like in the example below, you can see a big difference in the background blur with the only change of subject stepping away from the fence. All the camera and lens settings are still the same here.
Camera: Canon EOS 5DS R | Lens: Canon EF 85mm f1.2L II USM
Sky Natural Light | Photo by © Sergey Bidun
In contrast, if you want to include both the subject and the background in sharpness, place them close to each other and use a smaller aperture (bigger number, such as f/8 and higher). Since we changed f-stop from f2.0 to f8.0, we can see a huge difference in the way the background fence appears in this portrait. When everything is in focus, it starts to become more and more distracting from the main subject of the photo. High f-stops that have everything in focus are more fitting for landscape photography and at times street photography, but not fine art portraits.

Camera: Canon EOS 5DS R | Lens: Canon EF 85mm f1.2L II USM
Sky Natural Light | Photo by © Sergey Bidun
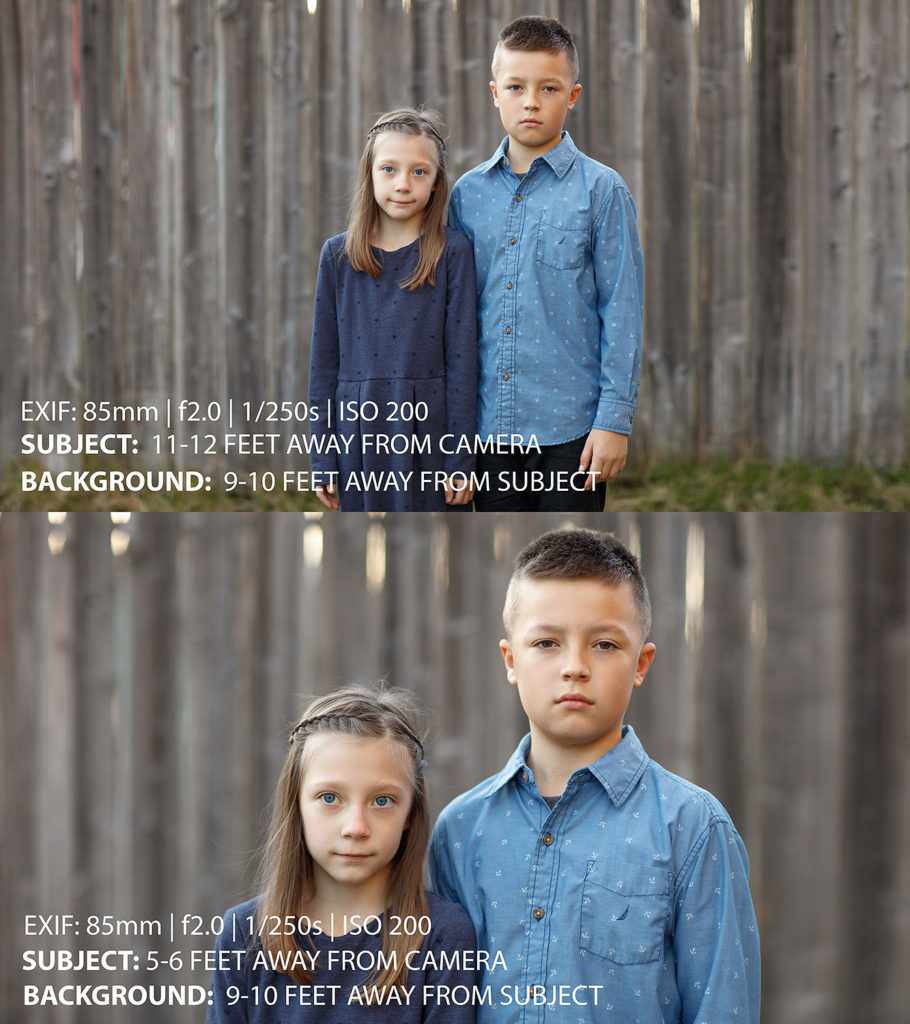
COME CLOSER TO THE SUBJECT FOR A BETTER BACKGROUND BLUR
In reality, the blurry background is a result of the shallow depth of field. The smaller the depth of field, the more blurry everything is that is not at the focus distance.
The depth of field also depends on the shooting distance – the smaller the distance, the smaller the depth of field, the more blurred the background. That is why, when shooting close-up, the background will have more blur. So, if you want to blur the background, do not take the photo from far away, come closer to your subject.
First, position your subject away from the background. Then come closer to the subject with your camera. Without changing your camera settings, you will have a better blur, also called the bokeh. Check my visual example below, what difference it makes on the background blur.
Camera: Canon EOS 5DS R | Lens: Canon EF 85mm f1.2L II USM
Sky Natural Light | Photo by © Sergey Bidun
RECOMMENDED LENSES FOR THE BEST BACKGROUND BLUR
All of the methods described above do not require any additional investments, just the ability to use the equipment that we have. These tips are accurate for any photo equipment. However, we can run into the limitations of our own equipment. Entry-level cameras, as a rule, are equipped with kit lenses with a focal length of 18–55 mm. These are versatile, inexpensive, and beginner-friendly lenses. But, frankly, blurring the background is not their specialty.
Yes, we can set them to the maximum zoom (focal length 55mm), but this is not enough since they have a small hole (aperture opening) and maximum f/5.6 at full zoom, which is not enough to create an amazing blur. But we remember that having a camera with interchangeable lenses gives you the ability to always choose a lens that is more suitable for blurring background purposes.
Let’s discuss some of our top recommended lenses so you can have a better idea which lens may be best for your photography projects.
FIXED LENSES
There are fixed lenses (they do not have a zoom, the viewing angle is fixed), which have a high aperture – up to f/1.2. Such lenses transmit 16 times more light than kit lenses. Fixed lenses are the best for use in portrait photography, due to their big opening hole, which lets in more light and creates fantastic blur.
They not only allow you to get a noticeably more powerful background blur but also help to create high-quality images in much lower lighting situations. But there are some limits: high-aperture lenses can have a high price, heavier weight, and no zoom abilities.
Camera: Canon EOS 5DS R | Lens: Canon EF 85mm f1.2L II USM
Sky Natural Light | f/1.2, 1/200s, ISO 800 | Photo by © Sergey Bidun
FIXED LENSES RECOMMENDATIONS
If using a fixed lens, I suggest using Canon EF 85mm f/1.2L II USM for the best blur. This is one of my favorite portrait photography lenses. If you are unable to get the above lens, you can still get good results with a more affordable Canon EF 85mm f/1.8 USM lens.
For beginners or someone who just wants a basic portrait lens, I suggest investing in a Canon EF 50mm f/1.4 USM. This is one of the most affordable lenses and is great for practicing shooting portraits with shallow depth of field. This lens is great for practicing shooting pretty much anything really, with its perfect focal length.

Camera: Canon EOS 5DS R | Lens: Canon EF 85mm f1.2L II USM
Sky Natural Light | f/1.4, 1/1250s, ISO 125 | Photo by © Sergey Bidun
TELEPHOTO / ZOOM LENSES
Zoom lenses are better suited for working with a shallow depth of field and a blurry background, as they can bring the image closer in the frame. Photographers often call such lenses telephoto lenses, or lenses operating in the tele-range of focal lengths. And if they have a bigger aperture (smaller f-number), then this is already a specialized tool, directed for photographing with a blurry background.
We mentioned that with the big aperture opening, you will get a more blurry background. But different lenses have different aperture opening limitations. The kit lens has a relatively small aperture – at the maximum focal length, you can open the aperture to f/5.6. In comparison, high-quality telephoto lenses with aperture f/2.8 can create approximately four times more blurry backgrounds.
Camera: Canon EOS 5DS R | Lens: Canon EF70-200mm f/2.8L IS II USM
Back Sun Light | f/2.8, 1/320s, ISO 200 | Photo by © Sergey Bidun
TELEPHOTO & ZOOM LENSES FOR BACKGROUND BLUR
One of the most wanted telephoto lenses for outdoor children and portrait photography is Canon EF 200mm f/2L IS. This lens creates the most beautiful compression and blur. Portraits taken with this lens have a dreamy and painting look. The cost of this lens is not affordable for many photographers, but it’s definitely on every portrait photographers’ wishlist.
From zoom lenses, I recommend using Canon EF 70-200mm f/2.8L IS II USM. This lens provides a great compression if you shoot at maximum zoom – 200mm. This is one of the best zoom lenses for getting good enough blur – otherwise, stick with the fixed lenses for high-quality blur.
Here is my tip for shooting with a zoom lens when you want to get a full-body shot in addition to just a portrait. Instead of zooming out, take a few steps back – this will keep the beautiful blur in your image. I suggest setting your focal length to 200mm for the best compression in the background.
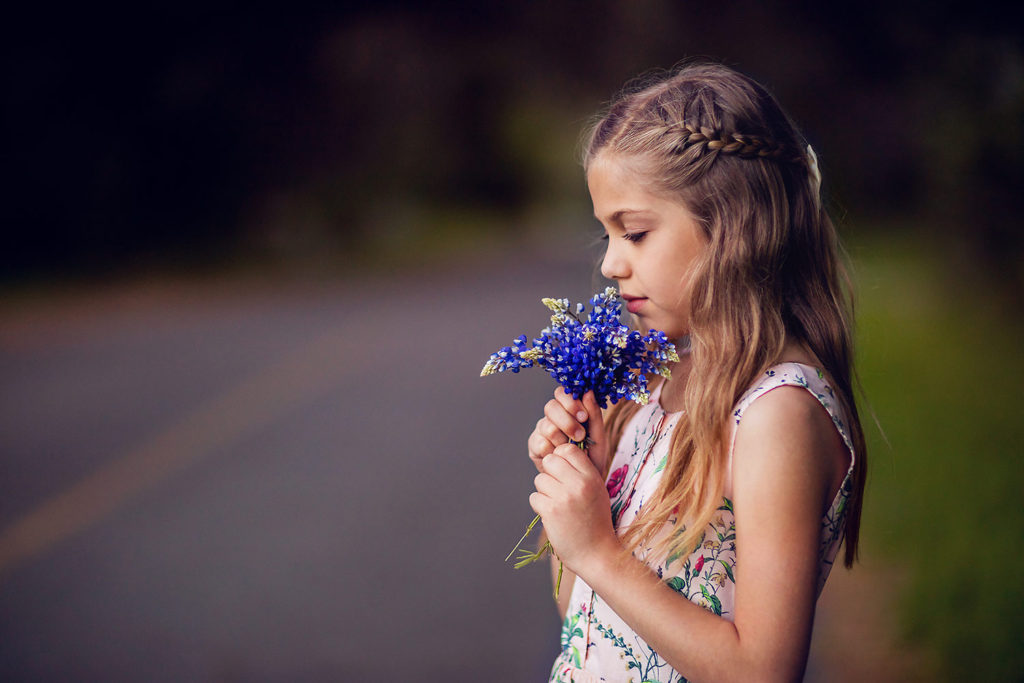
The image below was taken with Canon 70-200mm f/2.8L lens at f/2.8. Notice how only the girl and the pony and some wild flowers around them are in focus, and everything else is blurred out. This is the effect you will get once you start controlling your aperture and depth of field.
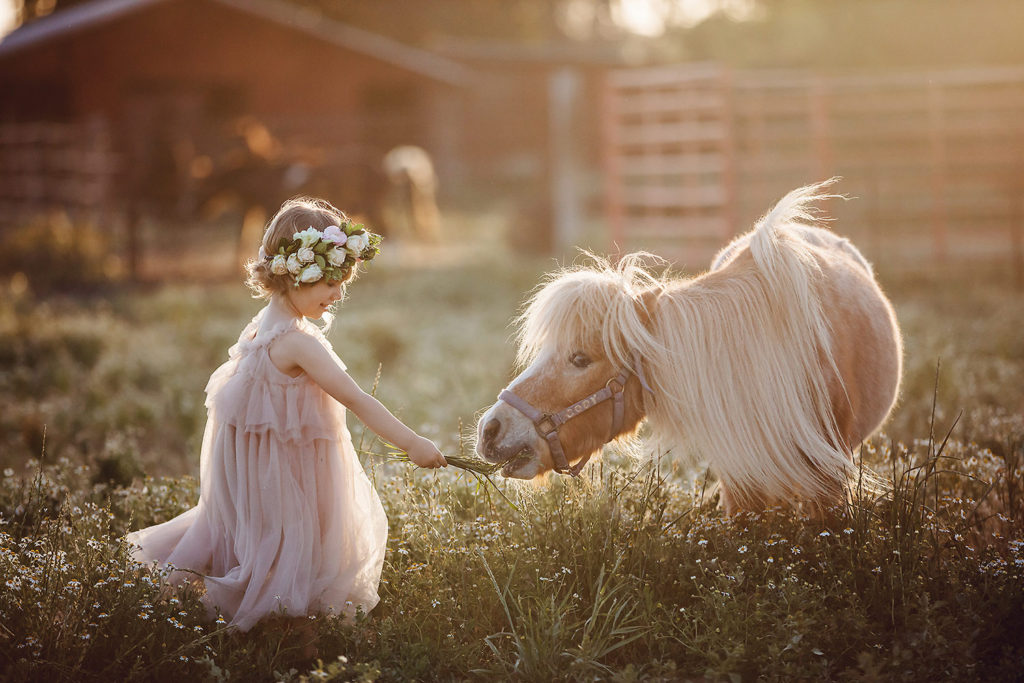
Camera: Canon EOS 5DS R | Lens: Canon EF70-200mm f/2.8L IS II USM
Back Sun Light | f/2.8, 1/5000s, ISO 1000 | Photo by © Sergey Bidun
MY LENS RECOMMENDATION FOR BEGINNERS
The best fixed lenses for portraits start at 50mm and above. For a special style of portrait photography, you can use a 35mm lens. For cameras with a crop sensor, the range starts at about 50mm.
As portrait photographers, we want the focus to be on the subject that’s being photographed. The best way to guide the focus is by using the right lens to blur the background and create a sweet bokeh. By controlling the depth of field in your image, you will be sure to create a masterpiece.
If you want to become a portrait photographer and are looking for the best lens to start with, I suggest starting with Canon EF 50mm f1.2L II USM or a more affordable Canon EF 50mm f/1.4 USM.

Camera: Canon EOS 5DS R | Lens: Canon EF 50mm f1.2L II USM
Sky Natural Light | f/1.2, 1/80s, ISO 1000 | Photo by © Sergey Bidun
MY RECOMMENDATIONS FOR ADVANCED PHOTOGRAPHERS
My all-time favorite portrait lens is Canon EF 85mm f1.2L II USM. It’s harder to get used to this lens for beginner photographers, so start with 50mm first.
For a more affordable version, you can use Canon EF 85mm f/1.8 USM Lens which will still yield pretty great bokeh and background blur.
The lenses referenced above are only our suggestions, and it does not mean that portraits can be shot only with such lenses. Based on years of experience, we can say that these lenses will provide not only a beautifully blurred background but also show the correct proportions of the face and body of the subject.

Camera: Canon EOS 5DS R | Lens: Canon EF 85mm f1.2L II USM
Side Sun Light | f/2.0, 1/250s, ISO 500 | Photo by © Sergey Bidun
I’m a Canon photographer and am using Canon equipment examples throughout the post. You can match these lenses with other brands such as Nikon, Sony, and others.
LOOKING FOR A PHOTOGRAPHER?
If you are looking to get creative high-quality portraits, do not miss the opportunity to reserve your photoshoot with Sergey Bidun, a professional Sacramento portrait photographer. View more of our portrait portfolio here. Contact us here.
CONCLUSION
Bokeh, or blurry background, is an interesting artistic technique. Photographers often use it as a marker of the fact that they are professionals and can make an “expensive” picture because good blurring of the background is possible only with high-quality lenses. However, to make decent shots, it is not necessary to have the most expensive equipment. Sometimes it is enough to fully master the equipment that you already have.
It’s important to remember that the more we blur the background, the less depth of field we have left to work with. That means the fewer objects in the photo will remain sharp. Therefore, in such cases, you need to carefully monitor the accuracy of the focus; otherwise, you can get a lot of blurry frames. Keep practicing with the equipment that you have, and you will soon start seeing improvement in portrait photography!
YOU MAY ENJOY OUR SIMULAR ARTICLES:
Natural Light Photography | How to Improve Outdoor Portraits
Posing Tips For Women Portrait Photography
IF YOU FOUND THIS POST HELPFUL AND INFORMATIVE PLEASE SHARE IN YOUR SOCIAL MEDIA.
Photographer: Sergey Bidun
Written by Maria Bidun

